Christmas in my house would not be complete without a DIY farmhouse Christmas chalkboard -- a la the reverse chalk transfer method, of course. By now I've used the method many times over the years and it has become a go-to project for me whenever I want to change things up with the seasons and/or holidays. And it all begins with my vintage white frame that I DIY'd into a chalkboard.
*This post contains affiliate links (Materials List in gold, below). A purchase of any of these items helps to support this blog and its creative efforts at no cost to you. To read more, please see my disclosure page.
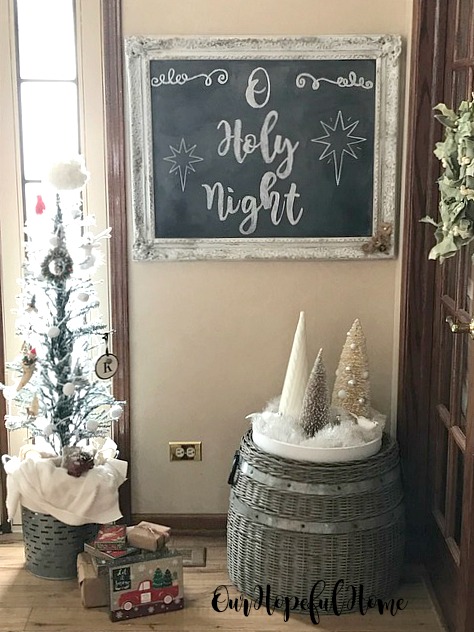
Here she is in all her glory. So are you ready to find out how I did it? I promise, you can do it, too!
Reverse Chalk Transfer Materials
Sharp No. 2 pencil
clear tape
painter's tape
chalkboard eraser
pencil or makeup sharpener with large hole
sidewalk chalk
dustless chalk
scissors
printer paper
computer printer
chalkboard
Note the large opening on this pink eye pencil sharpener. It's been my savior when it comes to getting a nice, crisp, pointy piece of chalk for my projects. Keep that point sharp!
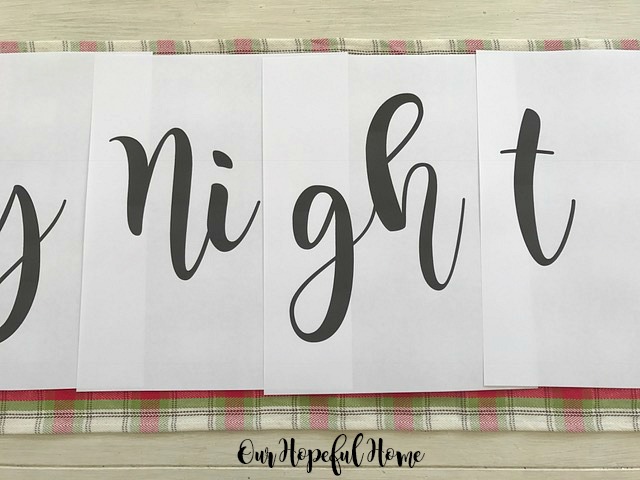
Before you start you need to decide what quote you want to use, what font you want to use and how large the letters and/or graphics will need to be. Based on the size of my chalkboard, I went into Word and created the words "O Holy Night" in the font Magnolia Sky, sized to 300. Then I printed them out (it took 6 pieces of paper) and set them on the table next to each other to see how they looked. So far so good. Before going any further I have a few tips to share that might make the process a little easier for you.
Chalkboard Tip #1
If you're as overwhelmed as I am when it comes to choosing a font for your projects, there's a website that can help. It's called Wordmark.it. It allows you to type in your saying or quote and then see it typed out in all the fonts you have installed on your computer! All at the same time. Then you can peruse them and decide which font looks best. Just click on the ones that are potential choices and then click "filter" at the top of the page. You will end up with a page like the one above, setting forth all your choices. You can then download the page or print it out for future reference.Chalkboard Tip #2
If you don't want to make the letters in Word, or don't know how, or need really BIG letters, then I'd suggest another site called Block Posters. You just follow their three easy steps and voila, you have your huge letters ready to go. I show how I used Block Posters in my It Is Well With My Soul Reverse Chalk Transfer Method tutorial.Here you can see a bit more clearly that only so many letters are printed on a page at any given time, depending on the font and size of the letters.
When you get to the 300 size fonts, it'll print out one, maybe two, letters per page. Then you have to improvise and cut the paper down so that it appears that the words go seamlessly together.
Next you'll place the printed words directly on the chalkboard to figure out spacing. By now the individual letters are taped together with Scotch tape to make the actual words.
Here you can see where I've already finished the "O" and have moved on to the "Holy." So how did I do it?
1. First, turn your word over, face down onto the table.
2. Now take a fat piece of sidewalk chalk and rub it over the entire word on the back side of the paper. Make sure the entire word is covered nicely in a good coating of chalk.
3. Flip the paper over to the right side and place it down carefully onto the chalkboard where you want it to go, gently adding a piece or two of painter's tape to ensure that the paper doesn't move while you trace over it.
Chalkboard Tip #3
It's very easy to accidentally get oil from your hands on the chalkboard while you're doing this. It can happen even just by putting the painter's tape in place if you're not careful enough. (Obviously, you need to try and keep your fingers, and arms, and wrists, from touching the board throughout this whole project.) Assuming that oil marks up the board (and it will), just wipe it away carefully with a good chalk eraser. No need to panic like some certain person has been known to do.4. Using your pencil, trace over the outline of the letters, one at a time, until the outside of each letter in the word has been traced over. Make sure to press the pencil down firmly to make sure you get a good image transfer. Here's what it should look like when you lift the paper:
PLEASE NOTE: In prior blog posts, after tracing the outline of the letters, I went on to actually color in each letter (not just trace the outline) with my pencil before lifting the word off the page. However, while doing this project, I happily came to the conclusion that YOU DON'T NEED TO DO THAT. Merely tracing the outline of the letters is enough. As long as you press the pencil down firmly you should be left with a clear outline. You can then go over that outline with your pointy chalk before actually filling all the letters in solidly with chalk.
Here's the "Holy" in the process of being filled in after I went over the original outline with my pointy chalk. It looks a bit rough, but I do go back and re-do the outer lines as well as the inner coloring to make it all look more crisp and uniform.
I used the transfer method to add the stars, but chose not to fill them in. I thought they looked better just as an outline.
The board is hanging in a corner of our foyer that we all pass by numerous times a day. I'm hoping that the sentiment will really sink in for us all.
O Holy Night, indeed.
It's right around the corner.
Well, that's it until next time, friends!
I hope you enjoyed reading about my
DIY Farmhouse Christmas Chalkboard
and that I've inspired you in some way.
Don't forget to Pin it!
Be sure to stay in touch:
Click HERE to subscribe.
Don’t miss another thrifty,
DIY home décor post!












Leave a Comment!
I like the sign. I like that whole corner of your home, so lovely. Happy Holidays, Kathleen.
Amalia
xo
Your tutorial was great! You put so much effort into it; it really makes that corner of your foyer.
Post a Comment