

You don't need to spend a lot of money to create an inviting Christmas vignette. Seriously. I'm so grateful that today's holiday decorating trends have swayed more toward using natural elements rather than store-bought items. Couple that common sense thriftiness with some Dollar Store add-in items and you've got a truly affordable, beautiful Christmas display that you and your family can enjoy throughout the entire holiday season.
I should start off by saying that I'm making an assumption here, that you have access to free fresh evergreens. We're blessed to have a number of evergreens on our property and I've always just cut the branches I need from our own trees. If you don't have any in your yard, perhaps you have a family member who does? A friendly neighbor? I could suggest a few suspect places to get some greens for free but I'm sure none of you would ever stoop so low as to steal in the name of frugal home décor, now would you? I will say that I've picked up a few tips over the years regarding how to do the actual cutting, and I've placed them at the end of this post for anyone who might be interested.
I started the project off using my latest vintage love, a gargantuan wooden tool caddy I picked up in an antique mall in South Haven, MI this past fall.When I got it I just knew it would be perfect for multi-seasonal decorating. Fall was nice, but I think it was really made for Christmas. Take a peak.

This photo was taken on our farmhouse table in the kitchen eating area. The problem with taking pictures in this part of the house is that the light is so darn bad, even though the arrangement looks awesome there. So for picture purposes I moved it out into the living room for the rest of the shoot since the light was so much better there. The retro silver tinsel garland in the background was also made by me a la Dollar Store.

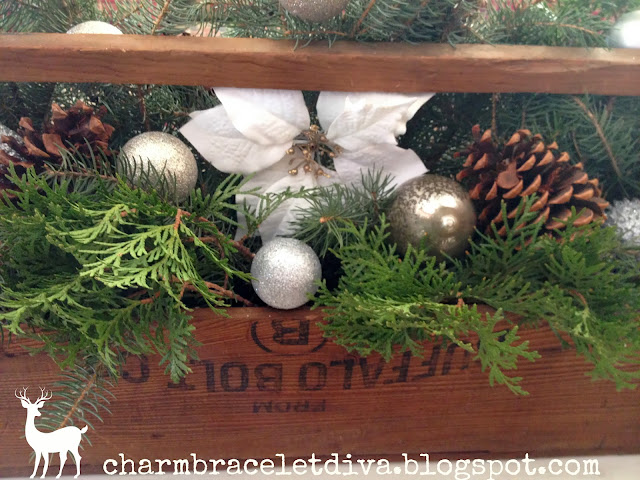
As you can see, I've gone for a minimalist look, with white and silver taking the spotlight. I think those colors go well with the green boughs and the brown pine cones. All the ornaments but for one, including the white birds, are from the Dollar Store, as well as the lovely poinsettia in the middle.


I ended up cutting two different types of greens. One is the more traditional evergreen, while the other is, I think, from a yew bush. It makes for a more visually appealing arrangement when you can mix together at least two different types of greens.

See what I mean?

I also love the look of the pine cones mixed in.

For those of you who have thought of cutting your own greens, but for whatever reason have held off doing so, here are a few tips I'm happy to pass along. I'm no expert, that's for sure. But maybe you can learn something from my mistakes experience:
Tips For Cutting Your Own Christmas Greens
-- DO NOT WAIT UNTIL THE TEMPERATURE DROPS INTO THE SINGLE DIGITS.
-- DO NOT WAIT UNTIL AFTER THE FIRST SNOW.
-- BE SURE TO WEAR THICK, PROTECTIVE GLOVES.
-- DO NOT TRY TO USE A PAIR OF SCISSORS! IF POSSIBLE, USE A LOPPER.
-- BEWARE OF THE SAP! SOME TYPES OF EVERGREEN BRANCHES WILL LEAK SAP AFTER YOU HAVE BROUGHT THEM INSIDE. THE SAP IS REALLY STICKY, FOLKS. SO WATCH YOUR CUTTINGS CAREFULLY, AND BE SURE TO PROTECT WHATEVER SURFACE YOU'RE PLACING THE GREENS ON OR IN.
-- JUST FYI: YOU CAN PLACE THE GREENS INTO FLORAL FOAM SOAKED IN WATER, HOWEVER, I'VE NEVER DONE THIS! AS LONG AS YOU DON'T TRY TO REARRANGE THE SET-UP, IT SHOULD STAY LOOKING PRETTY HEALTHY THROUGHOUT THE HOLIDAYS, AT LEAST UNTIL NEW YEAR'S. START PLAYING AROUND WITH IT AND YOU'LL START LOSING THE NEEDLES.
It's also nice to place greens in unexpected places like around your chandeliers, in urns, and as window toppers instead of curtains. And then there's always the mantel, over the front door and down the staircase railing. As they say, the possibilities are endless. But for now I'm just happy with what I've accomplished in my vintage tool box. I think it's a keeper. How about you?

Well, that's it until next time, friends!
I hope you enjoyed reading
Natural Christmas Styling:
Vintage Wooden Tool Box
With Fresh Evergeens.
Don't forget to Pin it!
Be sure to stay in touch:


Leave a Comment!
Kathleen, I can almost smell your greenery from here! I love fresh greenery and appreciate the tips on working with it. Your vintage tool box is lovely with the fresh greenery and white accents!
Love it Kathleen, simply LOVE it. Thanks for joining the dollar tree party.
This box is so pretty--I love the white and silver elements mixed in with the darker naturals.
wooden boxes and fresh evergreens are so beautiful together. Love the natural elements (pinecones) you added as well
How pretty!
I gave up using real greens in the house during the holidays years ago - allergies would go crazy.
Enjoy your evening and stay warm.
Beautiful! I always love things like that, but making greens and flowers look good in an arrangenent is definitely not one of my talents. I'm sure you think there's nothing to it, but believe me. There is. You haven't seen my attempts. LOL You dud a wonderful job.
I LOVE this! My boy scout just made a wooden tool box recently and he would love to see it all decked out. :)
Wow, I love it! Your tool caddy is perfect for displaying the pretty greenery, pinecones, and ornaments. Thrifty and gorgeous! We only have palm trees in our yard, but I do borrow some of the neighbor's redwood tree..you know, when it's hanging over the fence, lol.
I love your woodland style! I have a box like that and a Dollar Store nearby! Visiting from Open House Party and following you!
I love it, Your blog is adorable and very creative. Congratulations. Kisses and happy holidays.
This is my blog, see you:http://redecoratelg.blogspot.com.es/
So pretty! I've been longing for one of these boxes. You have decorated it so beautifully.
Hugs,
Patti
So pretty! I've been longing for one of these boxes. You have decorated it so beautifully.
Hugs,
Patti
So pretty! Thanks for linking up to Twirl and Take a Bow! Hope to see you again next week!
So fresh and pretty! I really love the natural holiday style!
I love the look of wood and natural greenery together. It's so nice to be able to walk outside and gather a few clippings to decorate with. Happy New Year!!
I love your tool box décor for the holidays. I'm pining this great idea.
Thanks for sharing.
Hugs,
FABBY
Love the combination of these elements! The colors are beautiful together and highlight the beauty of the wood. Would love to find one of these tool caddies soon! It's simple, elegant and so do-able! I might even be able to do it! LOL keep up the great work!
Post a Comment