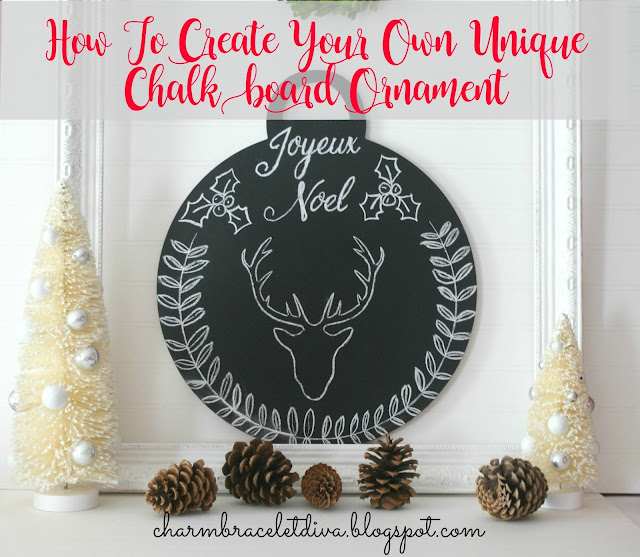
Have you ever seen an item in a craft store and think "That's kind of ugly, but with a little help...."? No? Well, it happens to me all the time. Last year, while shopping a Christmas clearance aisle, I stumbled across one of these so-called (by me) ugly ducklings and brought it home to give it an update for Christmas 2016. Are you curious? Let's take a look.
A group of friends and I get together once a month and create something according to a theme or challenge. November's theme is Christmas ornaments. The challenge is to create an ornament using junk or update an old one. I'd say this one qualifies as updating an old one.
I was going to paint the front side, but then I had an epiphany: why not paint the blank back side instead? Hello! That would be so much easier coverage-wise, not having to worry about covering up the red paint on the front. So that's what I did.
First, I sanded the wood surface so the paint would adhere better. Then I wiped off the dust and painted it with one coat of black spray primer followed by two coats of chalkboard spray paint. What, you really didn't see that one coming?
Here's what it looked like after the primer. You can still see marks left by the sandpaper, but that's ok. The chalkboard paint will cover that up.
Here she is after two coats of chalkboard paint.
I know you're supposed to "season" the new chalkboard surface before using it, but then you lose the nice, clean black background forever. So I skipped that step with this one. I will say that I had a hard time trying to figure out what Christmas saying (and font) I wanted to use. I ended up with Joyeux Noel (Merry Christmas, in Maphylla font).
I knew I wanted the saying to impart the reason for the season. And this certainly does, don't you think? How did I do it? Just check out my reverse chalk transfer method to find out. I used that method for the words Joyeux Noel.
I typed the words in WORD, applied the font and sized them to fit my ornament. Then I followed the reverse chalk transfer method.
For the deer head I used a stencil I picked up at Hobby Lobby for $1.99! (I'm sure it will be getting more use as we get closer to Christmas. It was a very well spent $1.99!)
How to Draw a Basic Wreath
As for the laurel wreath, I free handed it, very carefully. However, I was not without wreath-drawing help. I came across a great blog post that explained how to draw a wreath at Drawn To DIY.
As for the holly, I just googled "how to draw holly" and a TON of tutorials came up. As you can see, I'm a real budding Picasso.
If I can do it, anyone can do it. You don't have to be a natural talent when there are shortcuts and simple ways to get the end result you want.
So what do you think?
I think reindeer are going to be featured prominently throughout my house this Christmas. This is only the beginning!
I hope you enjoyed reading
How To Create Your Own Unique Chalkboard Ornament
How To Create Your Own Unique Chalkboard Ornament
Thanks for spending time with me today!
Make sure you stop by the links at the end of this post to see more upcycled Christmas ornament and decor ideas!
Make sure you stop by the links at the end of this post to see more upcycled Christmas ornament and decor ideas!
Don't forget to Pin it!
And be sure to stay in touch:
Don’t miss another thrifty,
DIY home décor post!
Kathleen


Leave a Comment!
Super Duper cute and a gorgeous vignette!
Yes, I constantly upcycle clearance finds ;) Love this--super cute!
Love the ornament. I do like a chalkboard decoration, you can easily change and update it if you want.
SO clever, Kathleen, and it came out beautifully. Chalkboard + deer = fabulous!
I much prefer the after! It looks amazing! Did you use a marker to do that chalk writing? If not you can change it each year.
I love this Kathleen! Great revamp of a clearance item.
Like the ornament Kathleen & I think I really like the unseasoned look of the chalkboard too.
You are one heck of a chalk board artist, how beautifully done, excellent.
Your new ornament is incredible, loving it. Think you were right about not seasoning board. That thing is pretty big isn't it, holy cow. Bet it will look incredible with other Christmas decorating.
Enjoy rest of week and upcoming weekend
Hi Kathleen,
Thanks so much! Glad you like it! :)
Tet | Drawn to DIY
Kathleen, this is perfect! I might have to try this on some old ornaments that don't fit my style anymore. Great tutorial!
Such a great idea to use the backside...your creation is much nicer! Great job!
I love this! It's great that you could see the potential to turn the original into something that goes with you style. Thanks for all of the tips, too. We're happy to have you partying at Snickerdoodle! Pinning.
Post a Comment