

Okay, so I have a Farmhouse Shelves Pinterest Board. (Go ahead and follow it, I know you want to.) There, I said it. Which only goes to show how determined I am to have my own farmhouse shelves, DIY or otherwise. I've narrowed down my options to two, and I'm really hoping to get your advice on which one of them I should choose.

I've been procrastinating on completing a dining room shelf project for months and months. Not unusual for me, I know, but maddening just the same. We were lucky (or unlucky due to the circumstances) to have had a dining room and living room face lift, so to speak, this past year after a roof leak. I got the new ceiling, new wall paint color (Agreeable Gray) and new trim color (white) that I wanted. I even brightened the look by removing the top of my large, dark wood china cabinet and replacing it with a white farmhouse corner cupboard with glass doors. But do you think I've hung even one piece of artwork or anything on the walls yet?
Nope, and now I need your help.
I've always been leery of putting nails in the walls, mainly because it seems, well, so permanent. Also, I suck at it. So I had the idea of putting up open shelving in the dining room. It would be in keeping with the farmhouse vibe while also allowing me to change out the artwork and/or decor as many times as I like without putting new holes in the walls! Make sense? My only problem is I can't decide what kind of shelves to hang! Hence, the Struggle Bus.
Option One: DIY Repurposed Shelves With Distressed White Corbels

During the dining room renovation we took down the custom-made curtains that were here when we moved in 14 years ago. Little did I know that what appeared to be run-of-the-mill style valances were actually long boards of wood with fabric stapled onto them. Each board is 48" x 3.5" and there were two boards on each of the five windows (both living room and family room) so that leaves me with 10 of these long boards just screaming for me to repurpose them!

After the boards sat in the garage for quite some, I finally managed to pick up white corbels from Ikea to finish the project. I really wanted to use architectural salvage for the corbels but anything vaguely resembling that was so out of my price range I finally gave up and settled for these. They weren't totally cheap, mind you. They were $7.00 each and I bought six of them. My plan was to distress them to make them look more vintage, rustic and farmhouse-y.

Here are the corbels set up as they would be right before we attached them to the shelves and wall.

I tried to simulate what it would look like when it was hung, but I had a tough time doing that without actually nailing the things to the wall! So these practice pictures (sitting on my rug -- I know, sigh) will have to suffice just to at least give you an idea of what I'm going for.

mending plate
The only thing about going with option number one is that I'd have to decide whether or not to stain or paint the wood, sand it, and then buy mending plates to hold two of the boards together for each shelf, which would make the shelves a generous 7" deep.

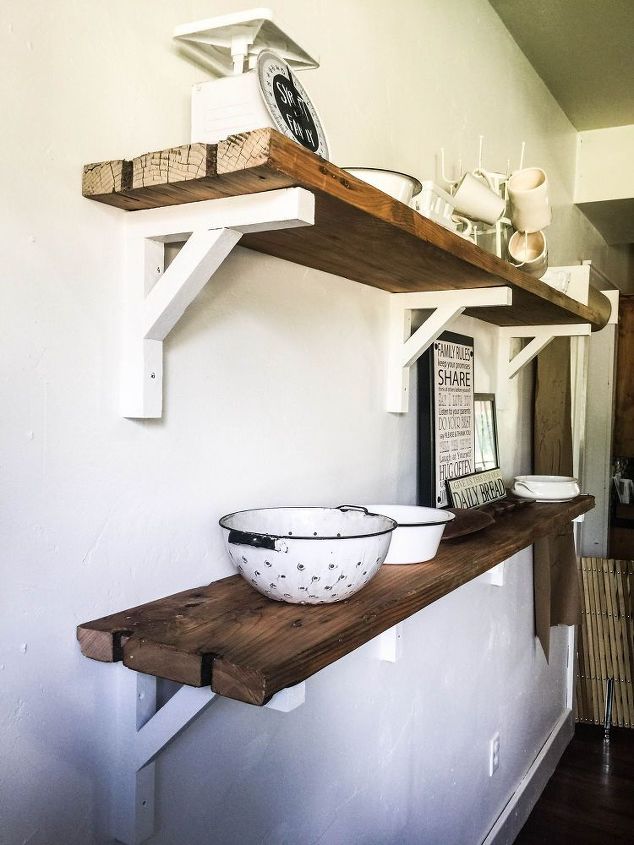
Here's the inspiration for Option Number One. Sarah, from Making Joy and Pretty Things, really hit a home run with these DIY Farmhouse Shelves. Natural wood and distressed white corbels. Oh, and did I mention that my walls are gray? Just like these!
Option Two: Premade Shelves With Traditional Craftsman Style Rustic Wood Brackets

Despite the plan to make my own shelves, on a recent trip to the local hardware store, I couldn't help but notice that there were planks of wood for sale in all types, sizes and finishes. I fell in love with their ash "cottage shelving" and brought two planks home as a test. (Please ignore the horrible lighting of this and the next few photos.)

Right across the aisle from the premade shelves were all types of brackets and corbels. I paired up the shelf with traditional craftsman-style rustic wood brackets. I thought that type of bracket was most appropriate for the farmhouse feel I was going for. I picked up four of them, two for each plank, or shelf. The planks were much shorter than the reclaimed wood at only 36" long (and 7 3/4" deep) so they only needed two brackets, rather than the three corbels each that the 4 foot long DIY shelves would need.


With the premade planks I would not have to worry about attaching two boards together to create the shelf (twice) but I would have to paint the brackets white. Not a big deal. And I also think I can upgrade to a longer plank/shelf as well, which would require more brackets.
Inspiration for Option Number Two. Ironically, the DIYer who made these farmhouse shelves is also named Sara (from Twelve On Main)! You can read all about the process in How I Built Reclaimed Wood Shelves.
So, you see my conundrum? I'm almost paralyzed when it comes to making a decision about which type of shelf to go with. I like the idea of both. But even as I'm writing this I think I'm coming to a decision. (I really hadn't counted on this happening!) Can you guess which one?
Yup, the really long reclaimed wood pieces from my old valances and the white corbels, distressed. And mending plates. The pros are clear: I'm repurposing free wood (always a bonus), and they're 4 feet long! Just that much more shelf space to decorate - and that's never a bad thing!
I feel good now that I have a plan (your opinions are still very much welcome, though) and can only hope that my husband is on board with helping me put it all together soon (like he has nothing better to do). I want it done by the latest mid-October so that I can start decorating for my favorite season of all -- fall! We really don't start getting fall weather here in the midwest until October at the earliest, so I want the project completed by October 1st. That way I can decorate for my favorite season of all -- fall, followed by a close second favorite -- Christmas!
I'll be sure to follow-up and share with you how the whole shelf-making/hanging project goes down. It should be interesting. And certainly feel free to let me know your preference: Option Number One or Option Number Two. I'm still very curious to know your thoughts. Who knows, you might just change my mind!
Well, that's it until next time, friends!
I hope you enjoyed reading about my
DIY Farmhouse Shelves -- Two Options.
And be sure to let me know if you have any thoughts
and/or comments on the whole process. I'd love to know!
Be sure to stay in touch:
Just click on my Facebook, Pinterest, Twitter or Instagram icons in my top right sidebar. You can also sign up there to receive my blog posts via email as well.
Don't forget to Pin it!


Leave a Comment!
Well...I do like the idea of using what you have. But I love the look of the second choice. So what would I do? Stain the wood you have a weathered grey. Either corbel would work although I like, again, the second choice the best. But that's me. Either will look great! I like that the boards you have are longer. They will look more substantial. Thanks for the inspiration...I just might have to do that in my dining area although I already have stuff nailed on. ;)
Hugs, Cecilia
Post a Comment