I've dreamed of owning a French provincial dresser for many years. And this year my dream came true! I knew I wanted one for the foyer. So after years of using a hand-me-down mid-century modern credenza my husband brought to our marriage 25 years ago, I was ready for a change. As a birthday gift he told me to go out and find the French provincial dresser of my dreams. When I found it at a local furniture resale store I knew it was meant to be.
This post contains affiliate links. A purchase of any one of these items helps to support this blog and its creative efforts at no cost to you. To read more, please see my disclosure page.
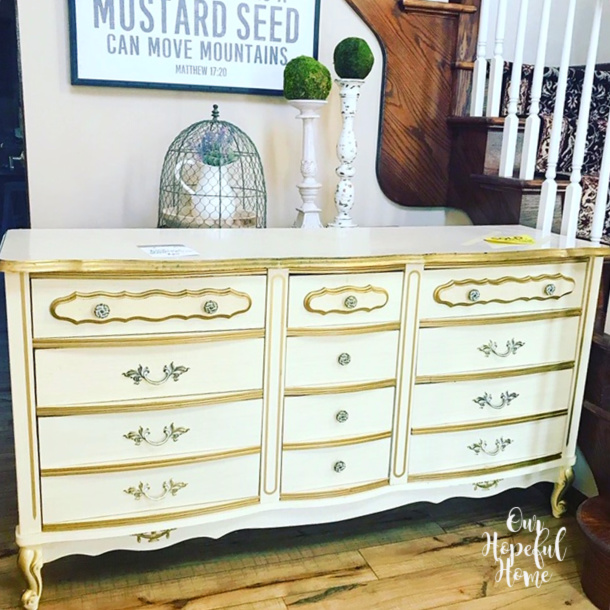
Here she is in all her pre-painted glory. As you can see, her color was an odd shade of yellow. And she definitely needed a good cleaning. But overall I was thrilled!
Photo Source: The Black Sheep Shoppe
A big part of what I loved about it was the attention to detail. I mean look at the classic French applique embellishments!
The detail continued with the raised scrolly drawer fronts along with the perfectly romantic French Provincial patina'd leaf drawer pulls and knobs. It's actually brass with white accents as you can see a bit better in the photo below.
While I'd classify the piece as pretty sturdy overall, some areas of "wood" left a little to be desired. Most of the dresser was in good shape, but in some places like this, the finish was worn or scraped away. But for the price I knew it was SO worth it!
I like to remove the drawers and place them on a table for easier access while painting them. Some people like to paint dressers with the drawers already in them but I think you can do a better job by taking them out and painting them individually.
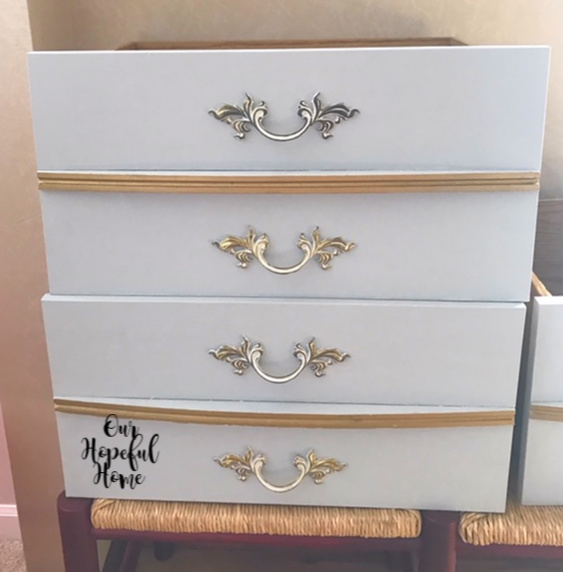
When I painted the first drawer I purposefully did not paint the top and bottom edge of the raised gold wood strip embellishment (what looks yellow in this photo). I took my time deciding whether or not I wanted to paint it white as an accent color or whether I just wanted to make it gray like the rest of the drawer.
My final decision was to go with keeping it all gray, leaving only the raised wood strip embellishment going straight across the drawer front in its original gold. As for the brass leaf drawer pulls, not all of them were worn the same, but I wanted it all to look like it had aged over time anyway, so I was okay with that.
Here is a close-up of the laminate dresser top.
Laminate furniture is made of synthetic materials that form a thin layer that looks like wood. Since it’s not actually made from wood, laminate pieces can look manufactured. It gets its wood grain appearance through a printed process.
Laminate does offer some resistance to damage and is easy to clean. However, you give up any hope of it looking realistically like wood. That was okay because I knew I wanted the top painted to match the rest of the dresser anyway. The only hurdle there was that laminate can be pretty hard to paint since it is very smooth and slippery.
I solved that problem with an 8 oz. jar of Dixie Belle Slick Stick. It's one of the best primers for smooth surfaces I've found. It stuck to the laminate top with no problem at all.
Here you can see as I began to apply the first coat of Slick Stick to the laminate top.
Here's the full first coat.
Two coats of Slick Stick ended up looking and feeling like chalk paint. It creates no fumes and washes up easily with soap and warm water. It also created a great surface for my Rust-Oleum paint to cling to. Below you'll find my list of things to do when taking on this French provincial dresser makeover DIY project.
Step-By-Step Guide To Painting A French Provincial Dresser
1. Clean the outside of the dresser with either a combination of vinegar and water solution, Magic Erasers or TSP. Clean the inside of the drawers with a dusting cloth and a hand vacuum if necessary.
2. Inspect the piece for any gouges and/or nicks in the wood.
3. Fill gouges and nicks with wood filler. Once dry (or following the brand's instructions), sand the areas smooth and vacuum away any dust before painting.
4. Remove all hardware and clean it well with TSP or Barkeeper's Friend, then place in well-marked zip-locked bags (so you know which drawers they should be returned to). If you are going to refinish or paint them, now would be a good time.
5. Tape off any areas you want protected from paint with painter's tape.
6. Paint the drawers. Some people leave them in while they paint them, especially if using a paint sprayer, but I prefer to take them out to paint them. I used Rust-Oleum Chalked Ultra Matte Paint in Aged Gray. It took two coats.
7. Once the paint is dry, reattach drawer hardware.
8. Before putting the drawers back in, paint the front of the dresser (all areas that will be visible even after drawers are put back in place). Once that's dry, replace the drawers.
9. If the top (or any other parts) of the dresser is made of laminate, be sure to pre-treat it with some form of primer. I used two coats of Dixie Belle Slick Stick. Then paint as usual. I used two coats of paint.
10. Paint any parts of the dresser that are left, i.e., sides, legs, back (I usually leave the back of a dresser unpainted since it will most likely be placed against a wall and no one will see the back), and any appliques that have not already been painted (optional -- I chose not to paint mine).
11. Once it's all completely dry, apply wax as desired.
NOTE: I'm not a big fan of furniture wax, since I think it can take away from the chalky look of the paint, but it does help protect your paint job. So I decided to wax the top of the dresser since that's the part that gets the most wear and tear and could use a little protection. I ended up using Dixie Belle's Best Dang Wax! in clear.
I applied it with a waxing brush and waited 15 minutes, then buffed it with a white, lint-free cloth (T-shirt) as per their instructions. Unfortunately, it turned out horribly -- the entire top was totally splotchy and mottled. I was devastated.
I emailed Dixie Belle and they said they didn't know why it happened and that they didn't know how it worked with paints other than their own line. That's all I could figure -- their wax just doesn't work with other paints, like the Rust-Oleum paint I used. The good news is that a few days after I applied the wax it seemed to blend in a bit better, although still not the look I had hoped for.
Here it is, styled for a previous post about my Fresh Farmhouse Hand-Stamped Book Bundle. While I think the white accent color on the top drawers look lovely in this picture, in reality it was quite a stark contrast and it really bothered me. So I went back and repainted those white areas with Rust-Oleum Aged Gray. And while the top may look white, it's really Aged Gray as well.
You can really see that the top is gray, and not white, in the above photo. You can also see how the top drawers blend in beautifully after I changed the white accent paint color to gray (but maintaining the original gold accents).
I lined the inside of each of the drawers with Dollar Tree repositionable quatrefoil-patterned contact paper.
This picture was taken for a recent post about my estate sale pedestal makeover. I am loving the group of chippy, shabby candlesticks and the pedestal hanging out on the right corner of the dresser.
I captured these final photos of this beautiful dresser in just the right light (not always easy).
I think this photo best represents what the Rust-Oleum Aged Gray really looks like. It's hard to get an accurate representation of the color in photographs.
I am absolutely in love with my painted French provincial dresser! What do you think?
Well, that's it until next time, friends!
I hope you enjoyed reading my
Step By Step Guide To Painting
A French Provincial Dresser
A French Provincial Dresser
and that I've inspired you
in some way.
in some way.
Don't Forget To Pin It!
Be sure to stay in touch:

Click HERE to subscribe.
Don’t miss another thrifty,
DIY home décor post!


Leave a Comment!
Beautiful job, Kathleen!
OMG this is a beautiful re love of a great piece. You go girl it looks fabulous. Happy Wednesday. xoxo
You did a wonderful job and the dresser looks great in that spot! I, too, wanted a French Provincial bedroom set as a kid. In a household with no extra money, it didn't happen. As I used to tell my kids when something didn't go their way, "It's nothing that years of intensive psychotherapy won't fix." They hated that answer! I did OK with a hand me down bed and auction bureau!
Such a good job! So much detail work! I hope you have time to join us on Embracing Home and Family Link party! https://theeverydayfarmhouse.com/embracing-home-and-family-link-party-6/
Thank you for the directions on painting a french provincial dresser. I had a set as a child and never thought much about it until seeing the style at an auction and outdoor market lately. I am in love with the style now. We are building a house and I've already bought two dressers in great shape. They're in such good shape I may have trouble doing anything to them. I've never refinished anything so I won't make these my guinea pigs. I've found some ladies who do nice work and work on other people's projects so they will do my work. I plan on putting both dressers in my bedroom. There's plenty of room and you never have enough storage.
I have many many pieces from this set. Many of them have that worn area under the drawers. I want to paint them all a sage green when I re-unite them all... as most of it I left at my parent's house and I plan to head over with my trailer for a visit after or during our next upcoming move. I noticed that it is scraped where the drawer slides are on the under side of the drawers so I'm thinking it could be smart for me to take the extra time and money to switch out the slides before or during my re-do process. I'm thinking maybe something like the roller ones that are in my ikea hemnes set, or in many kitchen drawers. They're on both outer sides so I'm hoping it'll help me distribute the weight of what is in the drawer nicer than the original that's a single wooden slide with metal bracket under the drawer. I have a set leftover from a previous project so I'm going to investigate this idea next week. I'm currently using the dresser I picked up locally to store my art and craft supplies. I'm in love with all these beautiful re-dos I've been seeing online 😍
What is the name of the Gold paint on the trims?
I have 7 pieces of this set..a gift to my sister and I from our great grandfather. Now my girls have the set and I would like to paint the gold trim. Do you have suggestions on what to use? Thank you lmkaminskirn@gmail.com
Post a Comment