Today I'm sharing how to make your own DIY lemon scented candles in vintage
tea cups.
This post contains affiliate links. A purchase of any one of these items helps to support this blog and its creative efforts at no cost to you. To read more, please see my disclosure page.
Before I begin the candle-making tutorial, let me say that I am no candle
making expert - not by a long shot. This was my first attempt, and at times
I truly felt like I was flying by the seat of my pants. There's a lot of
information out there and you can go nuts trying to read it all. I
eventually got to a point where I said, "Well, it's time to either
*expletive* or get off the pot." The following is a personal reflection on
my own DIY lemon scented candle-making experience.

While you can use any type of container you'd like for your DIY scented
candles (as long as it can withstand the hot wax temperatures, a.k.a. not plastic), I chose to
use some vintage tea cups from my collection. (And a few other containers as well, seen below.)
While some tutorials say that you should pre-warm the jars or containers
before filling them with hot wax, you first have to make sure that your
container can withstand the oven. When I googled "porcelain tea cups in
the oven" I found out that it's not recommended for them. So I skipped
that step.
DIY Lemon Scented Candle-Making Supplies
2. wicks (they come in different lengths and thicknesses so be sure to
get the right size -- just google "candle wick size chart" to find out the best size wick for your containers)
6. awl for making holes in popsicle sticks (optional)
7. power drill for making holes in popsicle sticks (what I used; optional)
*Ignore the wooden dowels in the photo. I decided against using
them -- I used popsicle sticks -- called centering sticks -- instead. I
just drilled a hole in the middle of the stick large enough so that the wick would fit through it. You can also purchase two types of ready-made centering sticks, links in list above.
How To Make Lemon Scented Candles In Vintage Tea Cups
1. Either drill or use an awl-like tool to create small holes in the
middle of your popsicle sticks, making sure the holes are large enough for
the wicks to fit through them. I used two centering sticks per
candle. You can also buy premade wooden or metal centering sticks.
Just be sure whatever sticks you use are the right size for the width of
your container opening, allowing you to place the wick directly in the center of the
container.
2. Using hot glue, attach the silver disc at the bottom of the wick onto
the bottom middle of the container. Once the disc is secure, add your two
popsicle sticks or centering stick(s) to keep the wick in the center of
the container and to keep it straight.
3. I ended up using a 1-lb. block of unscented, white parrafin wax. If
using a block, chop it up (carefully!) with a knife before melting, as I
did. This will facilitate the melting process. You can also buy wax pellets which eliminate the need for chopping (and probably melts
faster).
4. Place the wax into the top half of your double boiler (or Pyrex
measuring cup) and set aside. Fill the bottom of the double boiler pot or,
as in my case, whatever pot you are using, with water about half-way up.
Bring the water to a boil, then place either the top boiler pot or your
Pyrex cup into the water. This allows the wax to melt by indirect
heat.
5. Wait it out until the wax melts and ultimately reaches around 180
degrees fahrenheit. (I used that temperature because that's the most
common temperature I saw when researching how to do this.) The liquid wax
will now be clear in color. (It's not quite there yet in the above photo
-- note the milky whiteness.)
Unfortunately, it took my 1-lb. block of wax FOREVER (like two hours) to fully melt, and
even then it only got to 170 degrees. (In all fairness, my Pyrex cup was
hanging over the boiling water, but was not immersed in it. I think
I should have placed it directly into the water. Tutorials I reviewed did
not make that clear.)
Don't make my mistake! I've read that a 1-lb. block of wax should melt in
10-15 minutes. Not my experience, but take my advice and hopefully your
wax will melt fairly quickly if you place the top of your double boiler
directly into the water.
NOTE: For my second batch of candles I melted the wax in the microwave, at 60 second increments, and it worked out just fine -- as well being super fast!
6. Remove the now-clear liquid wax from the heat and let cool to around
170 degrees, which is the best temperature at which to add your scent (and
dye if you're adding dye as well). Then add either candle scent or
essential oil to the melted wax and stir for 1-2 minutes.
I used lemon
verbena essential oil since Michael's didn't have lemon candle scent. Some
say to use 1 ounce of scent per pound of wax. Others says use 30 drops of
scent per pound of wax. I used 60 drops of essential oil for 1 pound of wax and I still had
plenty left in the oil dispenser.
7. Now you can pour the liquid wax into the containers, being sure not to
disturb the popsicle sticks. Leave a little bit of room at the
top.
I thought I over-filled this jadeite tea cup, but keep reading to find out if I
actually did or not.
Assuming you have some melted wax left, save some of it for "topping off" the candles after
they've hardened. (You most likely won't get a flawlessly smooth top --
the wax tends to cave in around the wick. Hence the need for topping
off later.) If you don't have enough melted wax to save for later, don't
worry -- you can just melt some more and use that!
8. Let the wax dry for at least 1 hour before removing the centering
sticks.
If the wax level "deflates" after it hardens, or holes were created (see
above), you can now add the wax you've saved (after remelting it), using it to "top off" the containers and hopefully remedy any unsightly holes or
unevenness. I waited 24 hours from the initial pour before topping off any of my candles.
Here it is after topping it off with a new layer of fresh hot
wax (I didn't have any left over so I had to melt some more.). Once that top level has fully dried you can trim your wick down to 1/4"
for paraffin wax and 1/8" for soy wax.
I wasn't totally satisfied with this one since the wax definitely contracted, or shrunk, once it hardened, and there was a slight indentation around the wick (hard to see in the photo).
While it was not as indented as the first floral tea cup, I still topped it off for more of a finished look. I was pleased with the final look.
And while I was initially afraid I over-filled this one, once the wax hardened and shrunk a bit I could see that even it could use a topping off. Again, there was a slight indentation around the wick which is hard to see in the photo.
It looked much better after I topped it off. I ended up having to melt more fresh wax so that I'd have enough to top off all three tea cups. And since I was already at it I thought why not make a few more lemon scented candles in vintage containers? (Yes, I found this project addicting!)
So I found two more vintage containers to use -- a vintage pink depression glass sugar bowl and a chinoiserie porcelain trinket box.
After topping them both off I was very pleased with all 5 of my DIY lemon scented candles.
Then came the really fun part -- time to style them in a spring vignette on the coffee table.
I couldn't decide which one I liked better so I think I'll have to rotate them!


.png "This Fire King jadeite tea cup is in the Jane Ray pattern.")
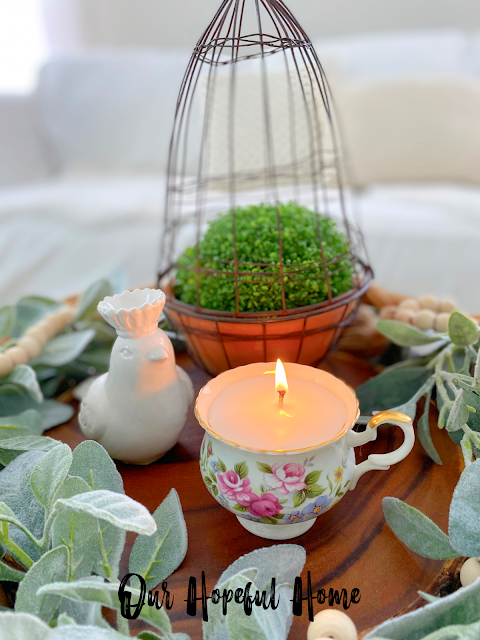
I love the warm glow it gives off. I've only burned this one so far, and unfortunately I haven't been overly impressed with the scent throw (the strongness of the scent and how well it travels throughout the room). While paraffin wax (what I used) is supposed to generate the greatest scent throw from added fragrance oils, I'm guessing I should have used a whole jar of oil per pound of wax for the greatest scent throw.
I'm also allowing for the possibility that each individual candle may have varying scent strengths so I'll just have to wait and see. I do think there's a learning curve to all of this and the more candles you make, the better you get at figuring these things out!
FINAL NOTE: If your wicks are way taller than you need (like mine were), after trimming them down you can take the excess and use that to make additional candles! Just buy some metal candle wick sustainer tabs (the small metal piece that attaches to the bottom of the wick) and match them up with your leftover wicks! It's a win-win. Well, that's it for today, friends!
I hope you've enjoyed reading about
DIY Lemon Scented Candles In Vintage Tea Cups
and that I've inspired you in some way.
Don't Forget To Pin It!
Be sure to stay in touch:
Don’t miss another thrifty,
DIY home décor post!

.png "Rattan trays are great for corraling small home decor items including candles.")


.png "Using two centering sticks helps to stabilize the candle wick while the wax is hardening.")


.png "This Fire King jadeite tea cup is in the Jane Ray pattern.")


.png)
.png)


Leave a Comment!
These are so cute. Love the idea of the popsicle sticks to keep the wick in the center. Cute and smell great what a nice gift these would make. Have a great day. xoxo Kris
They turned out SO CUTE, Kathleen!!! I Love the cups and other vessels that you chose to use! I've had success in the past with using long chip clips to hold up the wicks...just another tip to all the millions out there! Thanks for sharing your project!!
I enjoyed your tutorial. I have made simple candles several times and have found that I can smooth over bump-ly tops with my heat gun (for rubber stamp embossing). I remember reading somewhere that if a candle too quickly, that sinking in the middle happens. I keep my eye out for supplies at GW and yard sales and people often don't finish their projects! Kathy A
I got into this years ago but it's been a long while. You have some wonderful tips that I didn't use and I'm inspired to try this again. My favorite part was going to GW and finding really unique containers and giving them as gifts. Yours all turned out so pretty!!
Thanks for sharing step by step guide. Will definitely try this it.
Just adorable Kathleen! I just had to run downstairs and take out the teacups I had set to go to a friend's garage sale now! Great idea and a great tutorial!
Post a Comment