
Today I'm sharing how to make a Christmas tree using a styrofoam cone and some mini glitter ball Christmas ornaments. I remember seeing this type of Christmas decoration when I was a child and it brings back nostalgic memories for me. So I just had to make it, right?

This post contains affiliate links. A purchase of any one of these items helps to support this blog and its creative efforts at no cost to you. To read more, please see my disclosure page.

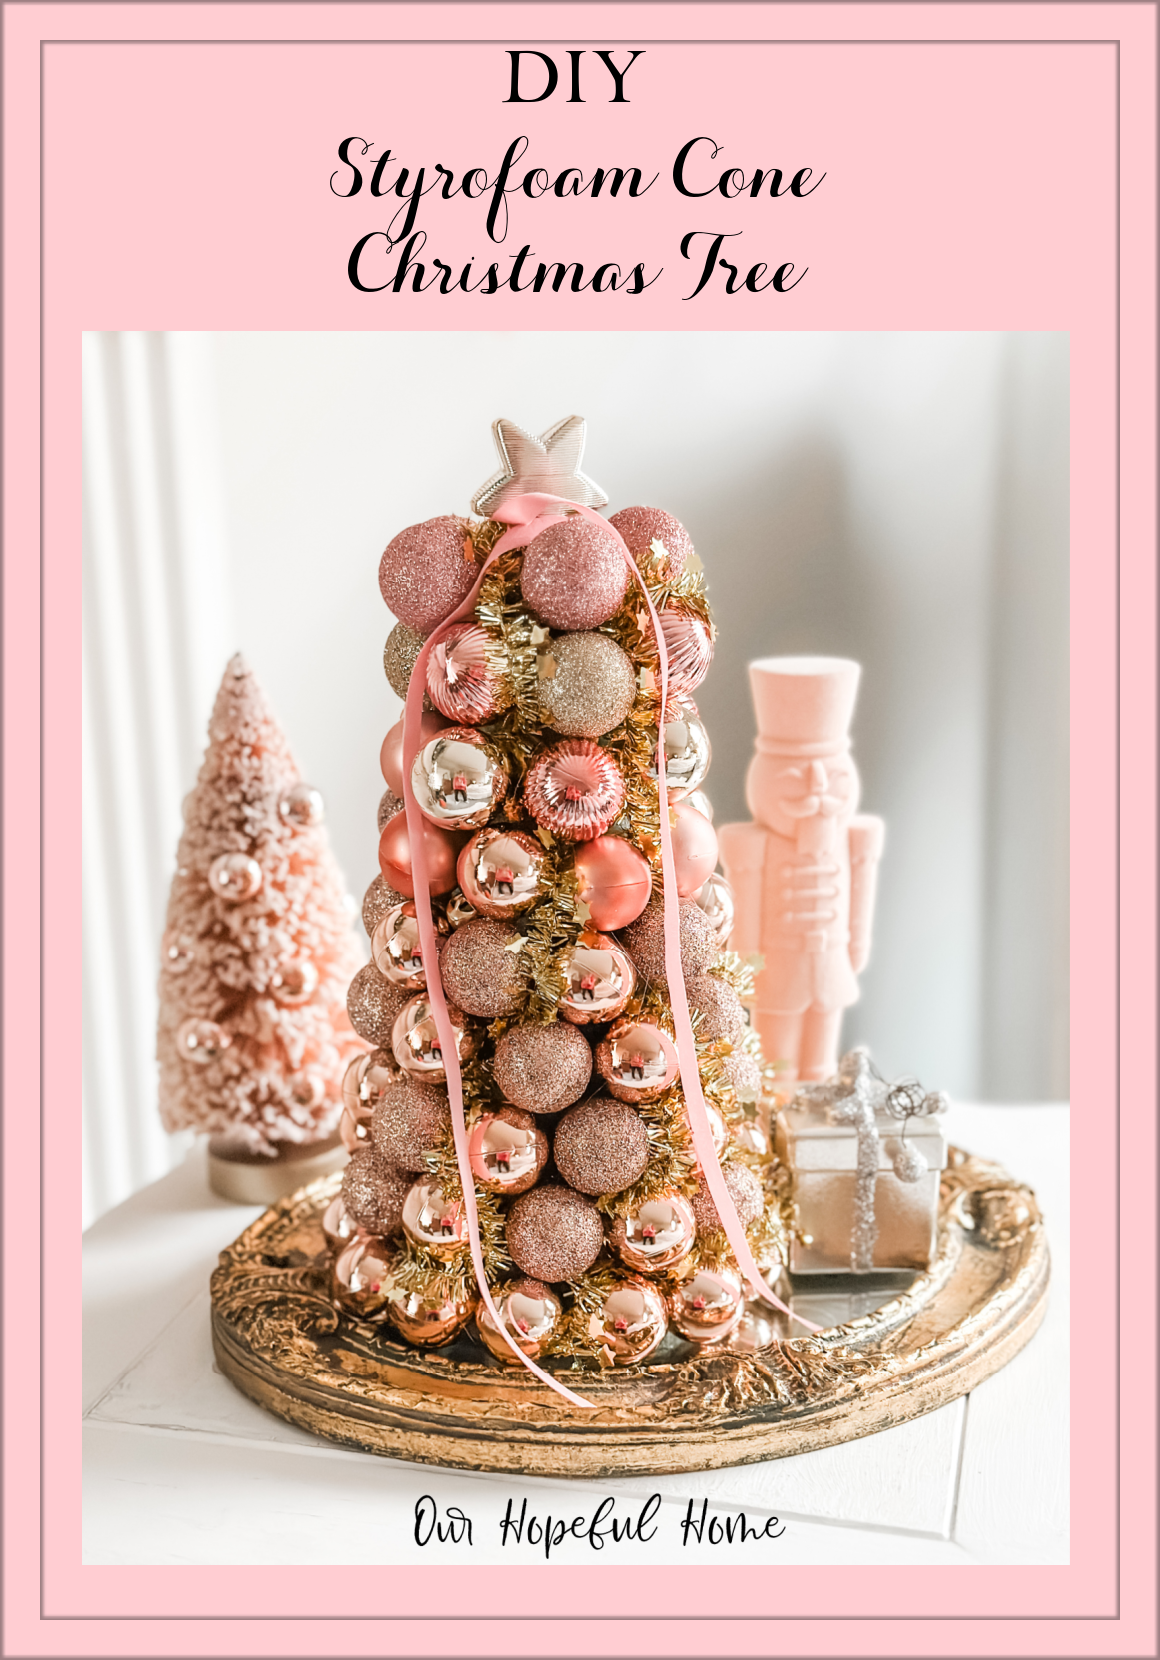
This one was made using a styrofoam floral cone and some (mostly) Dollar Tree ornaments.

SUPPLIES FOR DIY STYROFOAM CONE CHRISTMAS TREE WITH GLITTER BALL ORNAMENTS
styrofoam cone (I used an 8" tall green floral styrofoam cone from Wal-Mart; some Dollar Tree stores carry them)
mini ornaments (I used 4 boxes of 16 small glitter ball ornaments each from Dollar Tree, plus part of one box of My Little Christmas pink mini ornaments from Hobby Lobby for $3.50)
mini glitter Christmas garland (Dollar Tree)
mini tree topper - optional (I used a mini star ornament from the Hobby Lobby ornament set. I'd link to some mini star toppers on Amazon but as of this writing, so close to Christmas, the prices are incredibly high. I recommend Hobby Lobby sales or Dollar Tree Christmas craft supplies.)
velvet ribbon - optional (I got a great deal on pink velvet Christmas ribbon at Aldi. The Amazon ribbon I link to is gorgeous and I love it! I've gotten it in other colors and have used it in other Christmas decorating.)
HOW TO MAKE A STYROFOAM CONE CHRISTMAS TREE WITH GLITTER BALL ORNAMENTS
1. Remove all the ornament caps. Save for another day.

2. Set out all your ornaments in front of you and decide on a pattern. You don't have to be precise in your planning, but it's good to have somewhat of an idea as to where you'll want to place which ornament, i.e., do you want to create a color pattern (blue, green; blue, green) or just glue them on willy nilly and see how it all turns out?
Maybe you have a size preference, like starting on the bottom with larger ornaments and using smaller ones as you move up the tree.

3. Start hot gluing the ornaments according to your pattern plan. Just push the ornament into the foam first to make an indent. Then put hot glue on the ornament as well as inside the indentation on the foam before you fuse them together. I found that holding the ornament in place for about 60 seconds assured me of strong adhesion.
4. Once you reach the top it's time to add the mini tree topper. Honestly, you could put one last ornament straight down into the top of the tree (assuming its the right size) and call it a day. I might have done that if I hadn't had such a cute star ornament that worked so well as a tree topper.
5. Assuming you have gaps, or bald spots, between the ornaments (and you will), you can use a sparkly mini garland to fill in all the gaps.
Note #1: My styrofoam cone was green. In hindsight I wish I had painted it pink (or at least white) before adding the ornaments so that the bald spots wouldn't be as noticeable. However, the glitter garland did a great job filling in the spots.
6. Now (and this is optional) you can tie a thin velvet ribbon around the very top of the tree and let it drape down loosely for an elegant effect.
NOTE #2: I was surprised how many ornaments it took to cover that 8" styrofoam cone! The 4 boxes of 16 ornaments (64 total) from Dollar Tree was not enough. I had to go out and find more mini ornaments to match them (which I was so happy to have found at Hobby Lobby). So be sure to have enough ornaments before you start the project!

My initial display of this elegant styrofoam cone Christmas tree is set up on a vintage gold mirror to add to the glam vibe. I added a silver glitter Christmas gift box next to it for contrast.

Then I played around with the display a bit and added a vintage-inspired pink bottle brush tree that has similar ornaments, complementing my tree perfectly.


I really had fun with this project. It's not every day that I decorate for Christmas in pinks and rose golds. You can see where I got my inspiration for this styrofoam cone Christmas tree in my post How To Create A Romantic Christmas Mantel.
If you like this type of tree, but don't want to make one yourself, you can always buy one instead:
Costylean 16 Inch Christmas Ball Tree
16 Inch Small Tabletop Tree With Shatterproof Ornaments
.png)


Leave a Comment!
Kathleen, this is gorgeous! Of course, you know I LOVE the colors. I did not see any velvet nutcrackers at our Walmart, but now I will be on the lookout!
Post a Comment